Contents
Now that you have understood the basic concepts of front-end development, you are about to enter the actual project. This section will teach you how to initialize a react project with Umi that simply displays hello world.
You can get the relevant code in this course at https://github.com/ant-design/react-tutorial . You can use it as a reference when you cannot refer to the documentation to complete your own code. However, we recommend that you complete the code related to the course as much as possible. If you encounter problems or have questions about the course, you can leave a message at the bottom of the document to inform us.
Why do you need scaffolding
An ordinary web page will basically contain three key elements of HTML, CSS, and JS. This has not changed for many years, but the front-end development model has changed a lot. In the past, the front-end code of the web page we wrote can be directly run after being opened through a browser, but now for most front-end projects, the code we write is actually not native JS, HTML, and CSS, but is based on their extension The higher-level grammar comes out.
In this course, we will write a lot of React components (actually Antd is the implementation of Ant Design’s React components). These components need to be compiled into the final JS and CSS and then introduced into the HTML page to be correctly executed by the browser.
Since there is a compilation process, it is necessary to build a project scaffolding based on the compilation tool, so that we can use the tool to compile the code. The compiled code is the code that the browser can execute so that we can carry out the development and final deployment of the project.
Compilation tools
Front-end development involves not only JS, but also resources such as CSS, HTML, images, and other file types. For example, LESS script can improve the efficiency of CSS writing, TypeScript (Update later) allows you to write your logic with a new syntax. All these file types have been incorporated into the front-end R & D system. Most compilation tools can handle these different types of resource files.
The prosperity of the open-source community, on the one hand, allows us to have many tools, but at the same time it also makes the project initialization cumbersome.
This course chooses to use Umi as a compilation tool. In fact, Umi is not just a compilation tool, it is also a front-end framework. It encapsulates the community’s webpack, react-router, etc., so that we can quickly build a React project based on it.
Umi has various types of scaffolding to help you quickly start a project. In order to allow readers to better understand the logic behind Umi, this course will initialize a working scaffold from scratch.
Below, please follow the operation together, after completion, you will get a simplest application: web page display hello world.
1. Initialization
Directory Structure
After the initialization is complete, you will get a directory structure as follows:
-antd-course
  -config
    -config.js
  -src
    -page
      -HelloWorld.js
  -package.json
  -.gitignore
  -node_modules
This directory structure is just a reference for you later, you don’t need to worry about creating, just follow the steps below step by step to create this final structure.
Development environment
First, please install NodeJS . NodeJS is a JS execution environment. Umi is based on JS and needs to run on your development machine, so it depends on it.
After the installation is complete, execute the following command to confirm whether the installation is successful.
node -v
npm -v
We have adopted some new features of NodeJS in Umi, please make sure your NodeJS version is greater than or equal to
8.5.0.
Install umi dependencies
First, create an empty folder to store all the code for the rest of this course.
mkdir antd-course
cd antd-course
Then run npm initto initialize package.json, and so it was agreed NodeJS used to store project information and profile information.
npm init -yThe above command, the parameter -yindicates information required to provide npm, automatically presses the Enter key, the default value acceptance.
Next, install umi’s dependencies.
npm install umi --save-devAfter the installation is complete, you will find package.jsonin an extra devDependenciesconfiguration. This is due to the above command, parameters --savecan be saved to make dependency information package.json, so other developers only need to download the code after the execution npm installwill be automatically installed after the project depends on the package.
node_modules contains a lot of content. It stores the packages that the project depends on, and the umi code is also downloaded and installed into it. If you want to know more, you can refer to the npm documentation.
Create the first page
Next, let’s create our first page. Before creating the first page, we need to initialize the umi configuration.
In umi, a lot of configuration and conventions are used to help you quickly develop code. First, let’s create the configuration file. The configuration file is agreed config/config.js. In order to make later development more efficient, we recommend that you download a suitable editor or IDE to create and write code. In this course, we recommend that you use VS Code .
In umi, you can simply use .umirc.jsas a profile. Of course, config/config.jsis a second election. You can refer to umi’s documentation for more instructions.
config/config.js The contents initialized in are as follows:
export  default  ( ) => {
  return  < div > hello  world < / div>;
}
In this way, the first page is created, and the specific meaning of the code will be introduced in later chapters. Then you can start your code through umi. The first thing you need package.jsonis scriptsto add two commands inside:
{
  "scripts": {
+ "dev": "umi dev",
+ "build": "umi build"
  }
}scriptsDefined command, it can in the project root directory npm run [scriptname]to run. Next please execute:
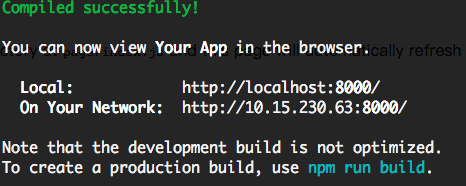
npm run devModify package.jsonthe time to note that it is a standard file format JSON, please check if the failure is not a problem or a comma quotes. If it goes well, the project will run. You will see the following log on the command line:

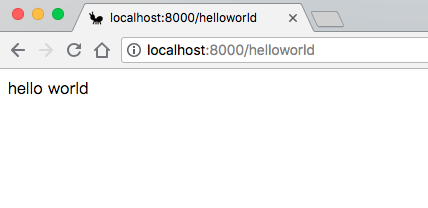
Copy the address in the log, for example http://localhost:8000/(the port here may be different due to being occupied or other reasons, please refer to the address actually printed on your machine). And followed by helloworld(such as the path http://localhost:8000/helloworld) opens in your browser, then you will see:

In umi, you can use the agreed-style routing, in pagethe following JS files are mapped to a route in accordance with the file name, such as the above example, access /helloworldwill correspond to HelloWorld.js.
In addition to conventional routing, you can also use configuration routing. As for which route to use depends on your preferences, this is not the focus of this course. In this course, in order for developers to better understand the routing component nesting, we will use configuration routing.
To use the route profile, you need to configure the file config/config.jsadd the following configuration:
export  default  {
  routes :  [ {
    path : '/' ,
    component : './HelloWorld' ,
  } ] ,
}
Wherein the component is a string that is with respect to pagea relative path of the directory. In the above configuration, we will become the route of the path configuration /, so that you access the http://localhost:8000 the home page will be able to display hello world.
When the routes are configured, umi will no longer execute the corresponding routing logic, but directly use the routes you declared through the configuration. For more information about routing, you can refer to the description in the chapter Routing Configuration. (Update later)
Add umi-plugin-react plugin
Umi is a pluggable enterprise-level react application framework. Many of its functions are implemented through plug-ins. In particular, umi’s official umi-plugin-react plug-in integrates some commonly used advanced functions. For later courses, we need to add the plug-in set to the project.
Firstly npm install umi-plugin-react --save-devto install the plug-in set. Then in the configuration file config/config.jsintroduction of the plug-in:
export  default  {
  plugins :  [
    [ 'umi-plugin-react' ,  {
      // There is no configuration added yet, the plugin will not work yet, we will open the corresponding configuration according to the requirements in the following courses
    } ] ,
  ] ,
  routes :  [ {
    path : '/' ,
    component : './HelloWorld' ,
  } ] ,
}
.gitignore
npm installation dependencies will be installed by default to the node_modulesdirectory. This directory usually does not need to be submitted to the code repository. If you are using git as a code management tool, then you can add .gitignorefiles to the root directory of the project to avoid unnecessary code will be submitted to the git repository.
.gitignore as follows:
node_modules
dist
.umi
Which .umiis a temporary entrance umi files generated during the development process to facilitate development and debugging, also do not need to submit to the code repository. distIt is a built product and usually does not need to be submitted.
We suggest that you can manage your code locally through git to facilitate the better operation of your code in the following courses.
git init
git add -A
git commit -m 'init'
2. Build and deploy
You can npm run buildto build the final product, after executing the command to generate the final HTML, CSS, and JS to the dist directory. They are codes that the browser can directly recognize and run, so you can deploy them to the server you want.
It should be noted that if you directly open the HTML with a browser, it will not be displayed correctly, because the path of JS and CSS introduced by HTML cannot be recognized by direct opening. You need to ensure that the HTML is in an HTTP web container, and ensure that the corresponding page access path is correct. For example, use serve :
npm install serve -g
serve ./dist
More deployment issues can be found in the umi deployment documentation .


Discussion about this post