


NestJs is a powerful frame work written in Typescript to help us building a fast and flexible web application. When talking about NodeJs, we often mention about ExpressJs or KoaJs but we may don’t know or forget about NestJs. It is not working like ExpressJs or KoaJs but also provide more functions that enable us to use multi technologies together without have to manual implement them with our own hand.
NestJs in other way have all the benefits of Typescript that we don’t have when developing with Javascript. In ther starting, it’s more difficult for us to develop using Typescript than using Javascript. But when you archive the Typescript learning process, you will love it and asking why you don’t know about it before. The benefits of using Typescript and NestJs is indisputable and i will talk about it in other post. Today we are here to talk about “Param Decorator”, a simple thing but help we so much in our work.
In NestJs controller, we have the fundamental decorator that help us quickly access and use the value of request body, params or query string:
@Body()To access the whole request body or a single body field if you passed the field name into this decorator call@Query()To access the whole query string object or a single query field if passed query field name in to this decorator call@ParamTo access route params that defined in your route configuration
You may read more about NestJs controller here: https://docs.nestjs.com/controllers but for this post, i will show you how to use each above decorator
Using @Body decorator
import { Controller, Post, Body } from '@nestjs/common';

@Controller('api/post')
export class PostController {
  @Post()
  async createPost(@Body('title') title: string) {
    return `Post ${title} created`;
  }
}
Look above example, as you can see here, we use @Body(‘title’) to access title field inside request post body. If you remember in ExpressJs or KoaJs, we have to extract this information inside a middleware or inside a route handler, it is more complicated than getting this information with NestJs. Now check about NestJs params decorator
Using @Param decorator
import { Controller, Get, Param } from '@nestjs/common';

@Controller('api/post')
export class PostController {
  @Get('/detail/:id')
  async createPost(@Param('id') id: number) {
    return `Post ${id} fetched`;
  }
}
well, now you see, it is so simple, we defined a route for get method with @Get(‘/detail/:id’), in this route, we define an :id param like other web framework, the magic is that @Param(‘id’) will automatically capture this param for us. Thing go with the same behavior for @Query decorator
Using @Query decorator
import { Controller, Get, Query } from '@nestjs/common';

@Controller('api/post')
export class PostController {
  @Get('/filter')
  async createPost(@Query('name') name: string) {
    return `Filter for ${name}`;
  }
}
Now if you don’t want to use Body or Param decorator, but using a traditional method: Query string, then you can use this useful decorator
with the code about, when you access some routes in this form: /api/post/filter?name=foo&otherFilterField=1 you can catch the name ‘foo’ with @Query decorator
These three decorators look great and we can use them to get almost things that we need in an api request. But why i sad “almost things” but not “every thing”?
There is one thing that we haven’t mention before, it is Pipe. It is a concept of NestJs that enable us to group our own logic code in one place that separated from our controller. Why we need this feature? Sometime we need to check for authentication, authorization, request validating or some check that needed before we are going to process the request. If we don’t have this Pipe, we have to put all of that auth/validate… code inside our route handler, and it’s ugly. We don’t want our code to be so complicated, and we need a method to write code for better maintenance.
You can read more about Pipe here: https://docs.nestjs.com/pipes
a simple Pipe should look like this
import { PipeTransform, Injectable, ArgumentMetadata } from '@nestjs/common';

@Injectable()
export class ValidationPipe implements PipeTransform {
  transform(value: any, metadata: ArgumentMetadata) {
    return value;
  }
}
We can write a Pipe to check for our post ID in above example
import { PipeTransform, Injectable, ArgumentMetadata, BadRequestException } from '@nestjs/common';

@Injectable()
export class PostIdValidationPipe implements PipeTransform {
  transform(id: number, metadata: ArgumentMetadata) {
    if (id > 10) {
      throw new BadRequestException('Validation failed');
    }
    return id;
  }
}
and use it like that
import { Controller, Get, Param } from '@nestjs/common';

@Controller('api/post')
export class PostController {
  @Get('/detail/:id')
  async createPost(@Param('id', PostIdValidationPipe) id: number) {
    return `Post ${id} fetched`;
  }
}
as you can see, the id captured by @Param(‘id’) will be passed into PostIdValidationPipe, this pipe will check for id validation, in our case, the id must be lower than 10…
This Pipe concept is useful but we can only have one type of information in each pipe implement, we can get the whole params object inside pipe if using: @Param(PostIdValidationPipe), but what happen if we need to access both Param and Body in a single Pipe?
The answer is that NestJs doesn’t have any builtin method to support this, and we have to implement it for our own self.
Lets start building our own Param Decorator
Create a paramDecorator with this content:
import { createParamDecorator } from '@nestjs/common';
interface IObject {
[key: string]: any;
}
export interface IIncomingData {
body: IObject;
params: IObject;
query: IObject;
req?: any;
user?: any;
}
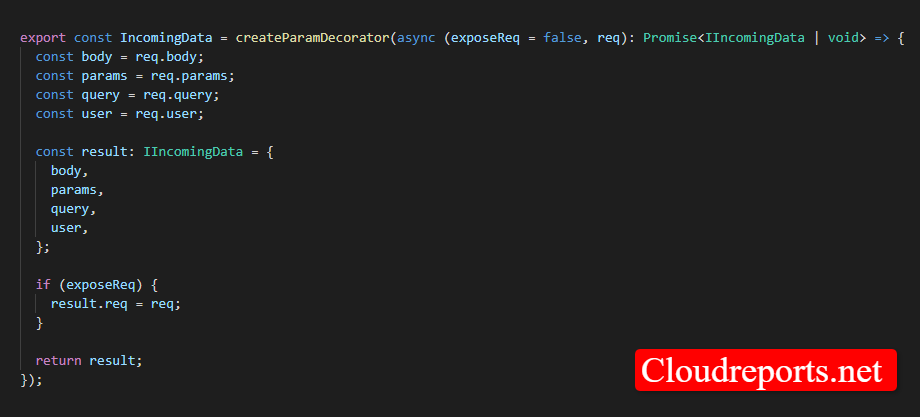
export const IncomingData = createParamDecorator(async (req): Promise<IIncomingData | void> => {
const body = req.body;
const params = req.params;
const query = req.query;
const user = req.user;
const result: IIncomingData = {
body,
params,
query,
user,
};
return result;
});In the code above, we use createParamDecorator , this function allow us to create a decorator that work like Param, Body and Query decorator, the interesting thing is that createParamDecorator allow us to access request object inside the handler, we can then extract all the needed information from request object, and this simple code is what we have to build
const body = req.body;
  const params = req.params;
  const query = req.query;
  const user = req.user;

  const result: IIncomingData = {
    body,
    params,
    query,
    user,
  };

  return result;
Now we can get all the request information in one place like this
 @Put(':id')
  async update(@IncomingData(PostDataPipe) post: PostDto) {
    const createdPost = await this.postService.create(post);
    return createdPost ;
  }
You can implement PostDataPipe with using both id param and the whole Post Body to do validation…
Thank you for reading my post! If you have any questions, please let me know!


Discussion about this post